Tuesday, October 22, 2019

Progress of a Doll’s Face

Here are the steps towards a finished hand painted face on one of my molded doll heads, made with my original sculpted moulds.  The last picture shows all the color ways worked out, yet not with the final sharp crisp details that will bring her face to life.  I’m saving that face photo for when I reveal the completed doll, with her felted wool hairstyle and unique clothing and accessories.

This first photo shows the sculpted face with its organic cotton jersey skin stretched over the mask:

Next I apply multiple coats of a tinted acrylic medium that contains fine marble dust to create the texture I desire while still allowing the ‘skin’ to retain some flexibility.

I build up multiple layers gradually allowing for complete drying between layers.  After these base layers are completely dry I rub the powdered Faber-Castell polychromos pigments into the doll’s face. This is my preferred medium rather than painting on her skin tone.  I believe it gives her a translucent complexion and creates vitality.  

As I work, I occasionally lightly spray the face with a matte sealant to preserve the work thus far. This allows me to remove future layers if I am unpleased with any step in the process.  I use a 000 sized brush and Faber-Castell Albrecht Durer watercolor pencils to create the facial details.  

Here she is, one last step for final sharpening and defining of her facial features, nearly complete.


Wednesday, October 9, 2019

Best Friends with a Norwegian Forest Cat

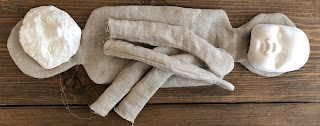
This is the doll I’ve been dreaming about for a few weeks. I’ve finished sewing the body and the arms, and all have been tightly stuffed with a non-allergenic doll filling. I need to stitch the fingers and wrist dimples, then attach arms to the shoulders at each end.

The face masks for a young girl and a long-haired cat have been cast in Paperclay, cured and had organic cotton jersey stretched over the masks for ‘doll skin.’  The masks are attached to the body and ready to have a skull created from the excess cotton jersey. This is stuffed to give the dolls a more lifelike profile. I usually prime and seal the cotton jersey before I attach the face mask to the doll, but today I’m getting all of the stitching done before I begin any of the wet processes.  I’m always trying new things and changing up my production process to see if an innovation gives me a better end product.  

I just finished stitching and stuffing the ‘skulls’ and decided to attach the arms now, too. I’ll be honest; there’s a very good chance I’m going to regret that decision. The arms may end up in my way while I’m painting but they may give me a more secure ‘hold’ for the more delicate features.  We’ll see. The benefit I’m assessing by attaching the face masks before I begin painting them is that the cotton jersey becomes like fine glove leather after it’s been primed.  This makes it paradoxically tough to sew through yet easy to tear when I sew it onto the doll’s body. I’ll let you know on a future post how these experiments in production turns out for me. 

I’ve shown this photo on an earlier post. These are the textiles I chose for dressing this doll.


Friday, September 27, 2019

Toby, the cat

It’s always an honor when I’m asked to create something another person dreams of, or envisions. I was asked if I could create a felt cat, working from photographs, in honor of a beloved cat lost in a tragic accident.  The tray below holds some of the shapes I cut from a vintage Pendleton wool blanket (you’ve seen that show up before in the sister’s doll hair) and a little roll of 1950’s era cotton bunting. Once upon a time that cotton bunting was a baby blanket belonging to me or one of my sisters.
He has quite a bit of personality with his cashmere ear tufts and a wired tail that can be repositioned. His eyebrows aren’t  always easy to see, so here he’s bowing to show them to you.


Toby was presented in an archival box with a tag describing the unique elements he is created from, and a note for his new owner.


Thursday, September 19, 2019

Starting at the beginning

I’m creating another pussycat and little girl Best Friend doll.  The Paperclay masks have been cast from my original sculpted moulds, partially dried and removed from the moulds to finish drying.  I like to sand and refine them one or two times, sometime more to perfect the surface and details. Next, I’ll stretch the organic cotton jersey skin over the mask and prime it with acrylic medium and marble dust.  The really fun part comes next - tinting the skin with my polychromos and painting on the features with watercolors and colored pencils.  This pussycat is going to be modeled after my beautiful Norwegian Forest cat, Princesse Marthalouise, seen here in her summer coat.
The doll’s 100% linen skin has been sewn and is ready for stuffing.
I’ve chosen fabrics for her skirts and aprons, including a vintage cross stitched guest towel and a tatted lace oval I gathered in the middle to a satin ribbon. I’ll select wool or cashmere for fur and hair after the faces have been painted and personalities revealed.


Tuesday, September 10, 2019

A Bespoke Doll

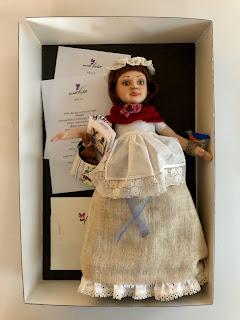
Anwyn and eKaterina are best friends.  This was a bespoke doll commissioned by a collector in northwest Ohio.  It was a great joy to imagine who this doll would become, and choose from my treasure trove of textiles and fibers to bring her to life. I am especially grateful for this friend and her trust in me, and support of my art, in commissioning this doll.

A few of the unique elements in her costume include an antique tatted lace student’s sampler round gathered to make a delicate lace cap on Anwyn’s auburn felted cashmere hair.  The solid beige linen skirt is fashioned from a small length of hand loomed linen, and eKaterine wears a striped linen and cotton skirt.  Each doll has an apron hand stitched from antique tissue linen handkerchiefs.  You can see a tiny bunny tucked into Anwyn’s canvas and leather tote bag and an Eastern Bluebird perched on  her wrist, while eKaterina has a teeny little mouse in her apron pocket.  These tiny friends, as well as the flowers on Anwyn’s infinity shawl, are stitched from bits of felted wool.  A girl need bling, and you can see that on the collar encircling eKaterina’s ruff.  The rhinestones came from the shoulder straps of a 1940’s evening dress and were stitched one at a time onto the black collar.


I present my bespoke dolls in archival boxes made by Gaylord Archival, with a Sweet Violet Dolls label  and a bit of violet ribbon fastening the doll securely to a backing in the box and on the lid, and a note for the doll’s new owner.


Tuesday, August 27, 2019

Painting Doll Faces


Growing up I lived in a small town in western Pennsylvania long before the days of internet commerce.  My dad travelled to New York City seasonally for business, and had a regular stop at an art store to bring back supplies for his resident artist, me!  I was in third grade when he brought back a wood box filled with 72 sticks of pure joy.  It was a case of FaberCastell Polychromos. I even lent them to my dear friend Marie when she was into tinting photographs.  I was in fifth grade when a cardboard box of Grumbacher soft pastels made the trip from New York City to St. Marys in Daddy’s suitcase.  Both are still with me and have been packed and unpacked in more home and studio moves than I can count.


In my current production process, I’ve discovered that I can rub a polychromos or pastel stick on a sheet of emery paper and turn it into a sheer to semi-sheer pigment powder.  Custom mixing these color powders and burnishing them onto the textured primed skin of my dolls with a soft sable brush, I can mimic the rich shades of live skin.  I seal the pigments with a spray of clear matte sealer before adding the final details with watercolor and colored pencils to bring my doll portraits to life.

Documenting my creative process with photographs and written descriptions doesn’t come easy to me. I have to break my creative flow to get the photographs taken and sometimes I just blow right past a phase and on to the next before realizing I missed an entire phase of the process.  For those of you who have been following me, I’m committed to staying with this endeavor, so keep checking in with me.

Saturday, August 3, 2019

Dress Up Dollies

Most of my creativity lately has been focused on a very special project.  I’m keeping the progress of this doll secret until she is completely finished, and has arrived at her new home.  Now, there’s something you can look forward to! 

Because the nature of my processes require time between production phases for drying or curing, I’ve also been working on an 18 inch dress-up doll.  This photo shows her body, with jointed hips and knees, and her face mask which is not yet covered with its cotton jersey skin or stitched in place. 

The 18 inch structure is the basis for the American Girl dolls which are all the rage for little girls.  The size of the doll allows for clothing whose size is not so small and fiddly to be difficult for little girls to undress and redress their dolls.  I have a basic wardrobe in the works for this doll, dress clothes and school clothes, play clothes, a tote bag and a toy. 

I spent this past Monday at the Strong Museum of Play in Rochester, NY studying the dolls made by Martha Jenks Chase and Izannah Walker.  They were the dress-up dolls of another century and it was an honor to be able to hold them and study all the handmade details in both the doll and her clothing. Very inspiring!